Shaw Direct satellite dishes are equipped with LNBFs that allow up to four lines to be run into your home. Most of our receivers require just one line to function, but our PVRs (both our original DVR 530 HD and newest Advanced HDPVR 630) need two lines. If you want to enjoy service to multiple rooms in your home, you may find that you’ll wind up needing more than four lines. If this sounds like you, then you’ll be happy to learn that we can offer a device known as a “multiswitch” in order to have more lines installed for more receivers!
But just what is a multiswitch?
A multiswitch is a device that consists of A/B switches (which switch back and forth between horizontal and vertical polarities, depending on what channel you’re trying to watch) and splitters that turn each LNBF port from one into two (or more depending on the type of multiswitch you have).
 Although
they may sound a bit like a simple splitter, a multiswitch cannot be
replaced by a splitter. Without the help of the A/B switch, splitting a
single line into two will cause issues with receiving signal. If one
receiver connected to a split line is viewing a channel on the
horizontal polarity, then the second receiver on the split line will
only be able to view another horizontal channel; it will not be able to
access a channel on the vertical polarity). For more information on the
two different signal polarities that we use, please see our article on LNBFs.
Although
they may sound a bit like a simple splitter, a multiswitch cannot be
replaced by a splitter. Without the help of the A/B switch, splitting a
single line into two will cause issues with receiving signal. If one
receiver connected to a split line is viewing a channel on the
horizontal polarity, then the second receiver on the split line will
only be able to view another horizontal channel; it will not be able to
access a channel on the vertical polarity). For more information on the
two different signal polarities that we use, please see our article on LNBFs.
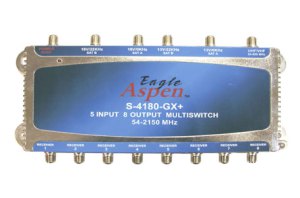
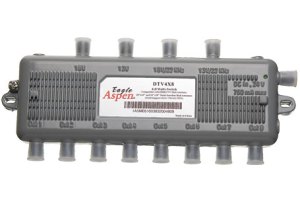
Shaw Direct generally uses a “4×8” multiswitch, which just means that it needs the four lines running from your LNBF connected to the four inputs, and then it can output signal for up to eight distinct lines. We also use a “5×8” multiswitch; the difference between this and the 4×8 is that there is an extra input that can be used to connect cable services.
For commercial applications where more than eight lines may need to be run, we also offer a “4×16” multiswitch, which will allow up to 16 lines to be run from the dish.
Multiswitches can be either “passive” (non-powered) or “active” (powered by an external AC source); our multiswitches are all powered to ensure strong signal strength in any system. Longer cable runs can result in lower signal strengths, but using an active multiswitch will help mitigate this.
A multiswitch can be installed either outside near the dish (it’s waterproof and works well in any weather condition), or inside your home (in a utilities room, for example). There must be a connection from each port on the LNBF to each of the four inputs on the multiswitch. From there, the lines would be run from the outputs to wherever in your home you require service. Remember that each account has a six-receiver limit, and if you wanted more than six receivers, you would have to open a second account.
If you’re thinking of adding a new receiver, but need a multiswitch in order to do so, don’t hesitate to contact us through here, on Facebook, Twitter, or by calling our toll-free number – 1.888.554.7827.