Tag Archives: convenience

eBilling – Easy as 1, 2, 3!

Wait! Who said you didn’t have super powers?! Whoever it is, go tell them off!
I’ll wait here!

22_bin

Seriously, though. You most definitely can do your part to make the world a better place. Heck! You’re probably already doing so! However, some of those many ways combine the useful with the pleasant. Take electronic billing for instance. Not only you get a notification through email as soon as your invoice is issued, but you also contribute to reduce the amount of paper in circulation. It’s somewhat like planting a tree with every electronic invoice you get. A green environment is a healthy environment! Hey! Put down that paintbrush and that green paint bucket! That’s not what I meant.

If we want to successfully make the world a greener place, we need to take the little details into account. After you sign up for electronic billing, you might want to have a personal account on our website. When we send your monthly billing summary via email, it is good practice for you to click the link to the detailed bill. That way you will be kept in the loop if we make any announcement. Besides, there are tons of things you will be able to do once you create an account online. Things like changing your programming, making a payment, viewing PDF versions of your invoices (those are very printer friendly), etc.

You can top it all off with an automatic withdrawal. The ways you can do this are literally endless. You can contact us to have it set up or… take a wild guess… Yup! You can also set up preauthorized payments through your personal account online. With instant invoice delivery via email, automatic payments through credit card or your bank account, the ability to manage your account online, all the power is yours.

Now you can simply sit back, relax, and let it all flow smoothly on its own. You can see more details here.  We thank you for your efforts towards a healthier environment.

By Rykselson H. A.

Sun Transit – Fall 2013

You may have heard the phrase “Sun transit” before regarding a twice-yearly natural phenomenon that may cause temporary signal loss. But, what exactly is Sun transit?

Sun transit is also known as a “sun outage,” or “sun fade.” During the Spring and Autumn each year, the Sun lines up with all satellites in orbit, which can cause interference with services down here. This happens due to a massive amount of thermally generated radio frequency noise from the Sun. The interference can range from a bit of snow on your screen to a complete loss of services. Some people might not even notice any issue.

Sun transit impacts every satellite in orbit, so all satellite service providers and even cable providers may experience issues while this is happening. Because we currently have two satellites, the estimated interference times are different for each satellite, so you might lose signal on an English standard definition channel at a different time than on a high definition or French channel.

Here are the estimated times for possible Sun transit interference on both satellites across the country (all times are approximate and local):

Anik F1-R (English standard definition channels)

Location Start End Duration
Vancouver, BC 11:42 AM 11:56 AM Oct 7 – 14
Whitehorse, YK 11:40 AM 11:54 AM Oct 9 – 15
Calgary, AB 12:46 PM 1:00 PM Oct 8 – 15
Saskatoon, SK 12:49 PM 1:03 PM Oct 8 – 15
Yellowknife, NT 12:46 PM 1:00 PM Oct 10 – 17
Winnipeg, MB 1:53 PM 2:07 PM Oct 7 – 15
Resolute Bay, NU 1:50 PM 2:04 PM Oct 11 – 18
Toronto, ON 3:02 PM 3:16 PM Oct 5 – 13
Montreal, PQ 3:04 PM 3:18 PM Oct 6 – 13
Fredericton, NB 4:06 PM 4:20 PM Oct 6 – 13
Halifax, NS 4:08 PM 4:21 PM Oct 5 – 13
Charlottetown, PEI 4:07 PM 4:21 PM Oct 6 – 13
St. John’s, NL 4:39 PM 4:53 PM Oct 6 – 13

Anik F2 (All HD, French standard definition channels, Galaxie, radio stations, and Pay Per View)

Location Start End Duration
Vancouver, BC 11:59 AM 12:13 PM Oct 7 – 15
Whitehorse, YK 11:56 AM 12:10 PM Oct 9 – 17
Calgary, AB 1:03 PM 1:17 PM Oct 8 – 15
Saskatoon, SK 1:07 PM 1:17 PM Oct 8 – 15
Yellowknife, NT 1:03 PM 1:16 PM Oct 10 – 17
Winnipeg, MB 2:10 PM 2:24 PM Oct 7 – 15
Resolute Bay, NU 2:06 PM 2:20 PM Oct 11 – 18
Toronto, ON 3:19 PM 3:33 PM Oct 5 – 13
Montreal, PQ 3:20 PM 3:34 PM Oct 6 – 13
Fredericton, NB 4:23 PM 4:37 PM Oct 6 – 13
Halifax, NS 4:24 PM 4:38 PM Oct 5 – 13
Charlottetown, PEI 4:24 PM 4:37 PM Oct 6 – 13
St. John’s, NL 4:55 PM 5:09 PM Oct 6 – 13

At this point, information for Anik G1 is not yet available as this is the first Sun transit the satellite has experienced. If you are missing any of the newest channels that we’ve added during the month of October, and the outage lasts for only a few minutes, chances are that it was Sun transit. If the outage lasts more than 20 minutes, there could be an issue with your system, and we recommend contacting us.

If you want estimated times more specific to where you live, Telesat offers a sun transit calculator on their website. Just make sure you’ve selected Anik F1R and Anik F2 for your satellites, “Ku” for your frequency band, and 1 metre for the antenna diameter so you get the most accurate results. It’s not exact as our satellite dishes are smaller than a metre in diameter, but it will give you a pretty good idea of when to expect interference.

So, what are some things that could help you during Sun transit?

  • If you are experiencing any loss of signal, wait until the estimated time for interference is over before trying any resets or calling in for troubleshooting.
  • Wait until after the estimated interference time for your area is over prior to activating any new receivers, or adjusting your dish.
  • If you are a fan of Pay Per View movies, it might be a good idea to order something that isn’t during the estimated interference time so that you don’t miss part of your show.

If your service interruption continues after the estimated time (give or take about 10 minutes), please contact us for assistance. On that note, if you have any questions regarding Sun transit, or anything else, feel free to leave us a comment!

*rg

NFL Sunday Ticket Deluxe

header_sustainment

For the ultimate football fan, check out the NFL Sunday Ticket Deluxe package from Shaw Direct! You can enjoy up to 14 games every Sunday for the entire regular NFL season, plus you’ll get access to RedZone HD, NFL Sunday Ticket Online, and the Shaw Go NFL Sunday Ticket app!

This year, we’re thrilled to announce that we are carrying 14 HD channels for NFL Sunday Ticket, which means you can catch all of the action so clearly, you might think you’re actually there.

RedZone HD is a channel produced by the NFL Network, which keeps fans up-to-date in real time. It switches from game to game as soon as a team goes inside of the 20-yard line (or, the “redzone”), so you can catch the most crucial plays as they happen.

NFL Sunday Ticket Online allows you to watch your favourite teams, regardless of where you are as long as you have a computer and Internet access. You will get all games in HD, full DVR controls, picture-in-picture viewing, player statistics, and more. You just need to ask for an access code when you subscribe to NFL Sunday Ticket, and then register for an account through the NFL’s website.

Not at home, and don’t have access to a computer? No problem; the Shaw Go NFL Sunday Ticket app has you covered. If you have an iPad or Android device, you’ll still be able to enjoy every play.

You’ll receive all of this for $50.24 (taxes extra) per month for the full NFL season. Wondering what you’ll need to enjoy this great package? You will need a 600-series receiver (the HDDSR 600, HDDSR 605, or HDPVR 630), as well as an updated xKu LNBF installed on your dish. If you’re not sure what kind of equipment you have, follow the instructions here to find out. If you need any upgrades, contact us for more information.

*rg

Parental Controls on 600-Series Receivers

ratings

We carry a wide selection of programming for audience members of all ages. Of course, this means that there may be content that you don’t want the young ones in your home to view. That’s where parental controls come in. Parental controls on the Advanced 600-Series receivers allow you to enable locks specific channels, and certain ratings for both TV shows and movies.

Rating information is provided by the individual broadcasters, and this information is entered into our interactive programming guide. When you’re looking at a show that is listed in the guide, press INFO on your remote to see what the rating is.

Certain shows (for example, documentaries or older programs) may not have ratings assigned to them. If you’re concerned about potential content in unrated programs, the 600-Series also allows you to lock content without ratings, too.

In order to set parental locks, press OPTIONS on your remote, and then 2 for “Parental Controls.”

The first time you enter this menu, you’ll see a prompt asking you to enter a four-digit code for your parental locks. Choose your code (as a tip, don’t use something like the last four digits of your phone number, or something like a birth date as these may be common knowledge in your household), and then press ENTER. You will then be asked to confirm the four-digit code you just entered. Punch this in, and press ENTER again.

parentalcontrolscreenYou’ll now see a screen pop up called “Parental Controls.” The first thing you’ll want to do is highlight the line for “enable locks,” and scroll to the right using the arrow keys until you see “enabled.” This will turn on the locks that you’ll set momentarily.

The next two lines will be “TV rating” and “Movie rating.” Highlight whichever you’d like to edit, and then use the right or left arrow keys to scroll through the different ratings. As a tip, the rating you choose means that that rating, and anything above it will be locked. So, if you choose to lock PG for TV ratings, 14+ and 18+ will also be locked.

Next, you’ll see “locked channels.” Use the left or right arrow keys to either “hide” or “show” channels with locked content. The option just below is “locked” programs, which you can do the same with. After this, you’ll see “channel locks,” which allows you to lock the content of a specific channel.

Below this is “change password,” which of course allows you to enter a new four-digit code.

The last item is “unrated programs,” which comes in handy in a couple of different situations. As mentioned earlier, some programs may not actually have a rating assigned, so you can’t be sure if the content is appropriate for your kids. Locking content without a rating removes this risk. The second scenario can happen after your receiver has been reset, or the guide information is reloading. The guide will not have any information in terms of program title or rating, so enabling locks will lock all channels until the guide information has been restored.

Have any questions about parental controls on the Advanced 600-Series? Leave us a comment below!

*rg

Ordering Shaw Direct Pay Per View

ppv_entertainmentPerhaps you’re a fan of sporting events like UFC. Maybe you can’t get enough of the latest Hollywood hits. Or, perhaps 3D movies are your thing. Whatever your preference, Shaw Direct’s 32 HD Pay Per View channels have got you covered! Pay Per View is available to all Shaw Direct customers, so even if you don’t have a high speed Internet connection capable of supporting Shaw Direct On Demand, you can still enjoy the latest movies.

Our Pay Per View channels run from 950 to 953 for standard definition, or 960 to 983 for high definition, plus 986 is devoted to nothing but 3D movies. If you can’t view all of the listed Pay Per View channels in your guide, you may need an upgrade to part of your system; if you would like more information on upgrading, check out our previous article on the topic.

If you’ve never ordered Pay Per View before on your Advanced 600-Series receiver, it’s easy. First, open up your interactive programming guide by pressing GUIDE on your remote, and then navigate to the Pay Per View channels you’d like to browse (depending on whether you’d like to view standard definition, high definition, or 3D).

You can scroll through the Pay Per View channels by using the up or down arrow keys on your remote, and you can view what’s on later by pressing the right arrow (jumps ahead by 30 minutes), the fast forward button (jumps ahead six hours), or the skip forward button (jumps ahead one full day).

orderid

When you’ve found what you’d like to order, highlight the listing and look at the description of the title in the top right-hand corner of your guide. Just underneath of the title of the program, you’ll see “Order ID” followed by a four-digit number. Note this, and then call 1.866.782.7778. Follow the prompts provided by the phone system, and when asked, enter the four-digit order ID.

Once this has been completed, you’ll just need to go to the channel that the order was made for at the time the program is scheduled to start, and you’re ready to go!

For those of you who use PVRs, you can record Pay Per View titles that you’ve ordered, and you will have 48 hours to watch the title from your PVR list. After the 48-hour period has passed, the title will expire.

Wondering what’s on this month? You can view a list of the newest releases here.

*rg

Shaw On Demand Search App

Ever wanted to figure out what you should watch when you get home before you get there? With the Shaw On Demand Search app, you can do just that. Whether you’re waiting for the bus or on the train, you can browse our entire Shaw Direct On Demand library from the comfort of your mobile device, and even order your pick so it’s ready to go as soon as you get home.

The app is currently available for Apple iOS devices and Android, so you can get it for your iPhone 3GS and up, your iPad 2 or the new iPad, on any iPod Touch device, and any Android device with version 2.2 and up. You can download it for free from Apple here, and from Google app store for Android here.
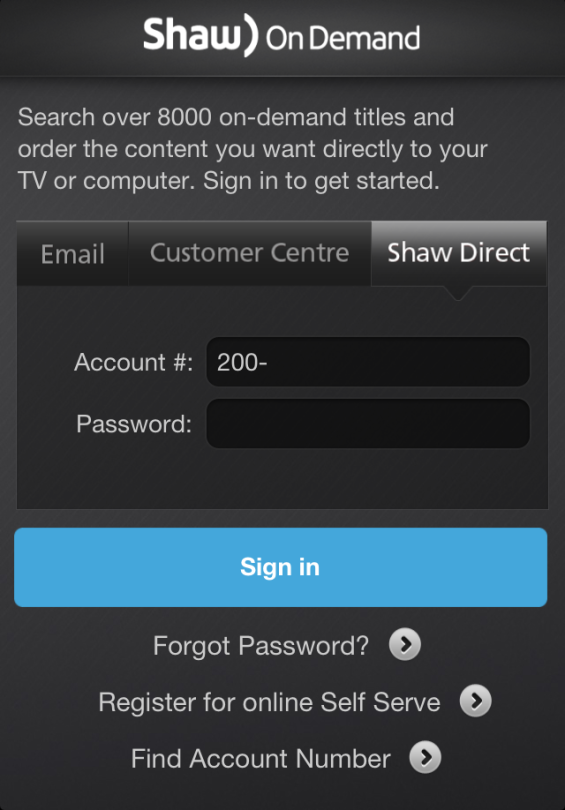
sod01When you launch the app, you’ll be taken to a login page with three different options; the first two (“Email” and “Customer Centre”) are for Shaw customers, while the third (“Shaw Direct”) is the one you’ll want to tap on. To login, you need to ensure that you’ve already registered for an online ShawDirect.ca account. You’ll also need to know the password that you used for the online account, as well as your account number.
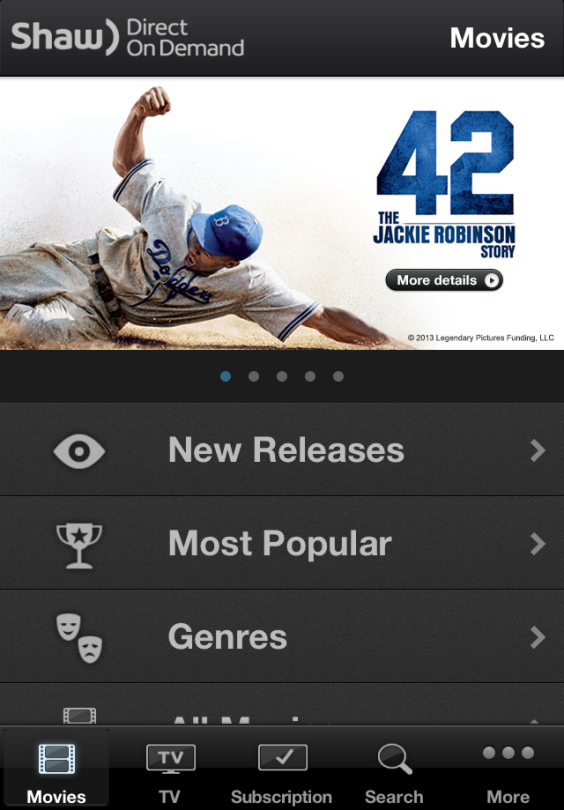
sod02Once you’ve entered this information and the login has been completed, you’ll automatically be taken to the main “Movies” page, which allows you to browse the listings in several different ways, including by genre, by newest release, and by the most popular titles. Pricing for these titles ranges from free up to $6.99 (taxes extra).

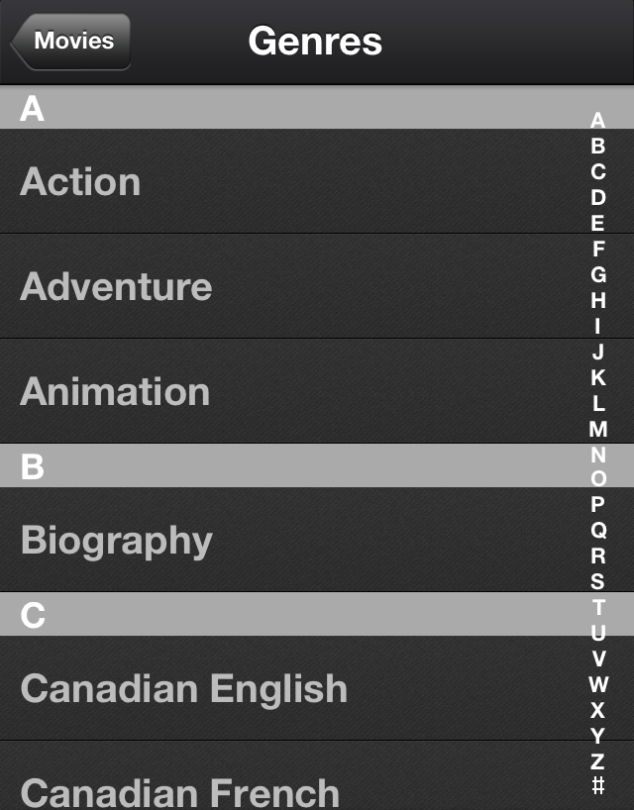
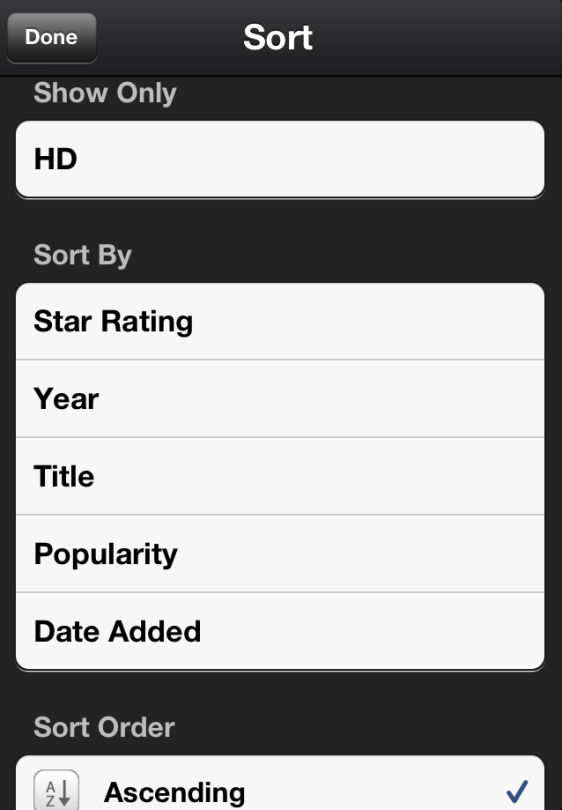
One of the browsing options that we liked was “All Movies,” which takes you to a master list of all available movie titles. The cool thing about this is that you can alter the results by tapping on “Sort” in the top-right corner. Here, you can choose to sort alphabetically by title, by the year of release, by the star rating,  by popularity, and by the date the title was added to our library, which is great if you’re not entirely sure what you’d like to watch yet. You can also choose to only have the app display movies that are available in HD.
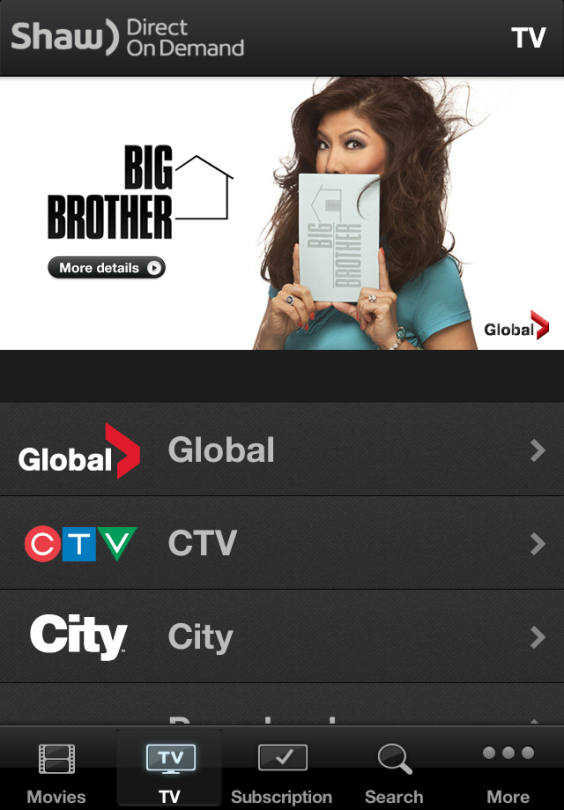
sod13 sod14

The icons along the bottom of the screen will take you to the other areas of Shaw Direct On Demand listings, including “Movies,” “TV,” “Subscription,”, “Search,” and “More.”

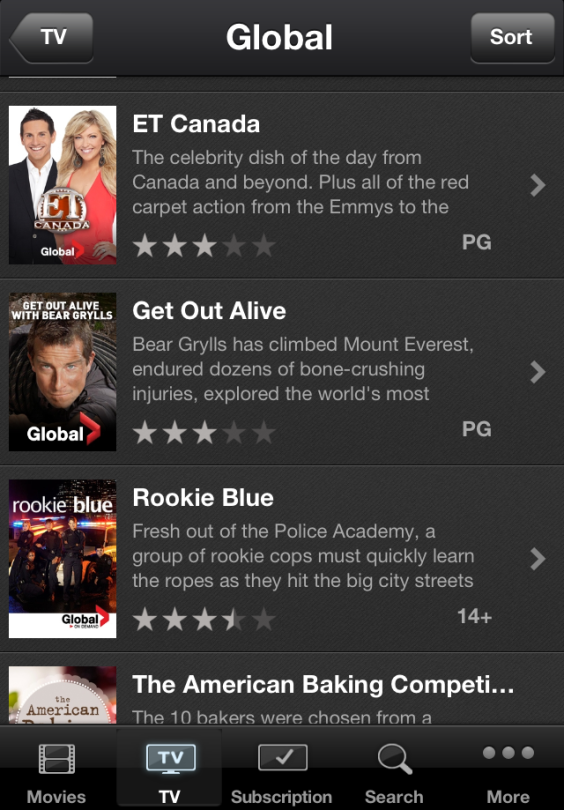
Tapping on “TV” will show you all of the On Demand titles offered by a variety of broadcasters; the titles will be broken up by the different channels, and the content listed here will be available at no charge as long as you have a subscription to the channel.
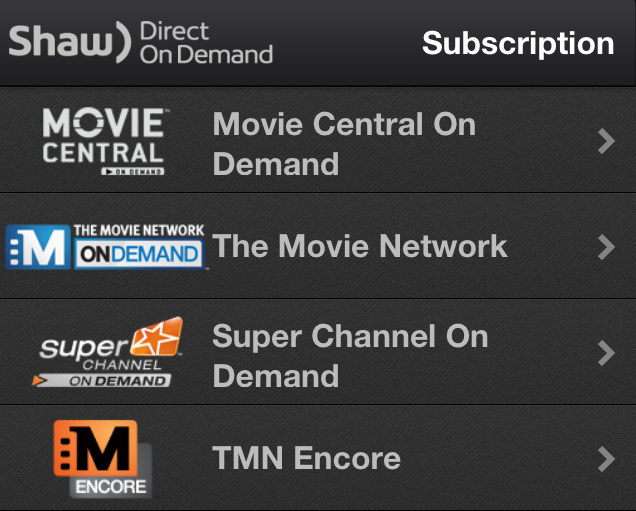
sod03    sod10

sod04Speaking of subscription, the “Subscription” section will list premium channels such as Movie Central or The Movie Network. If you have a subscription to one of the premium channels, you’ll receive On Demand content from that channel at no cost.

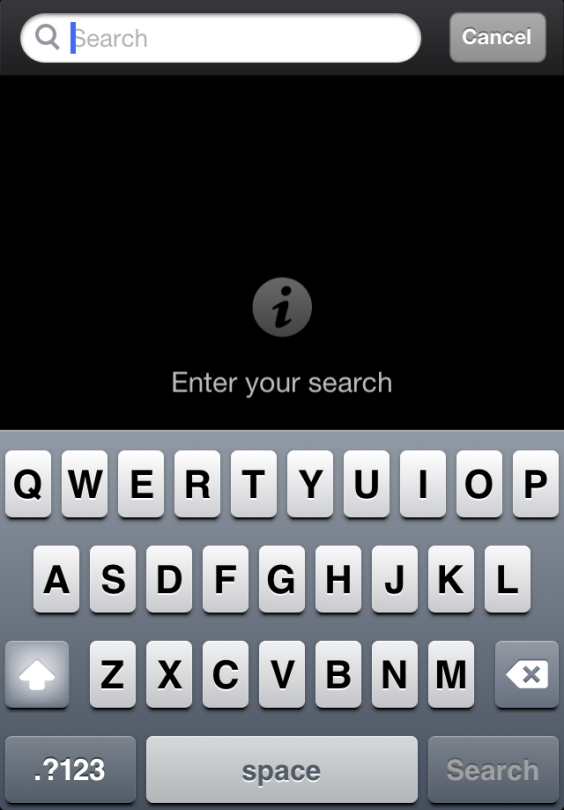
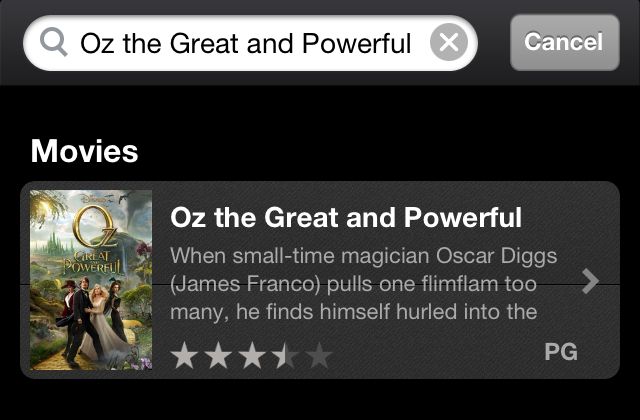
“Search” allows you to look for listings by their title, by the name of one of the listed actors, or by the director’s name.
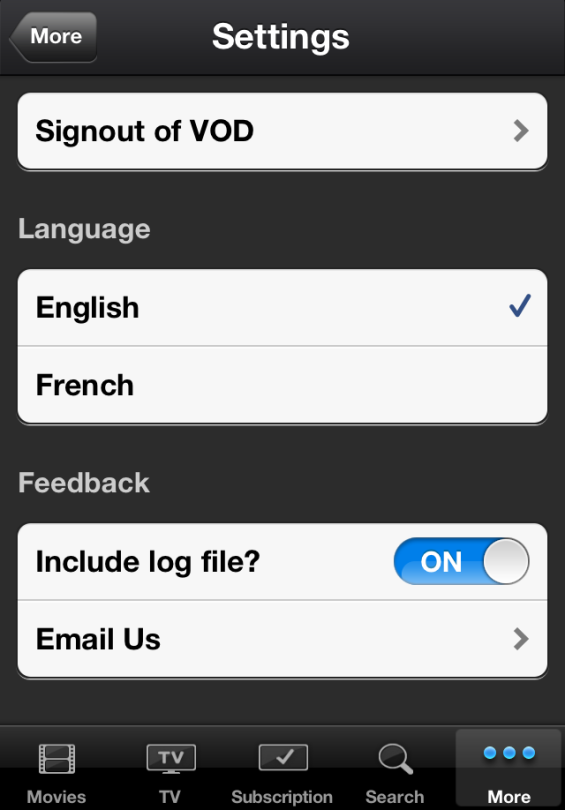
sod05

sod06

sod11“More” provides you with the option to view titles that you’d like to watch in future (“Wishlist”), your current orders, settings (including changing your preferred language), general help, and allows you to search for content based on a specific language (“Multicultural”). You can also sign out of your account through here.

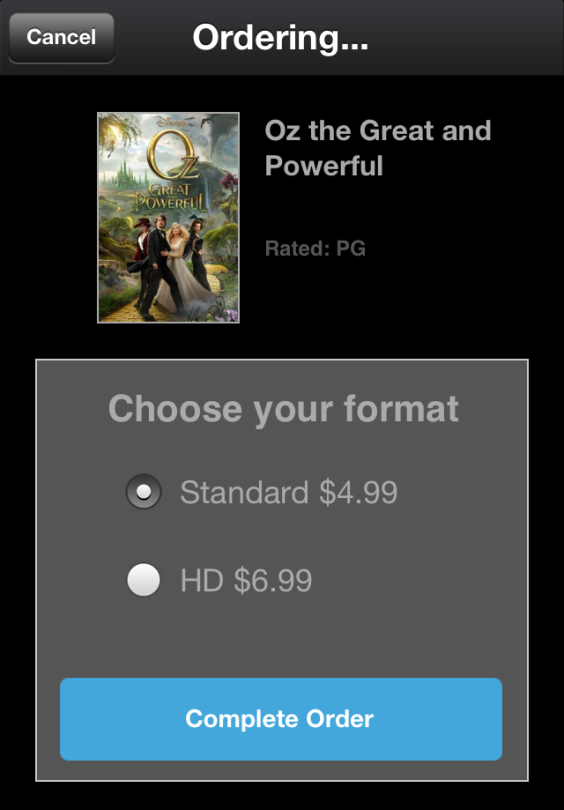
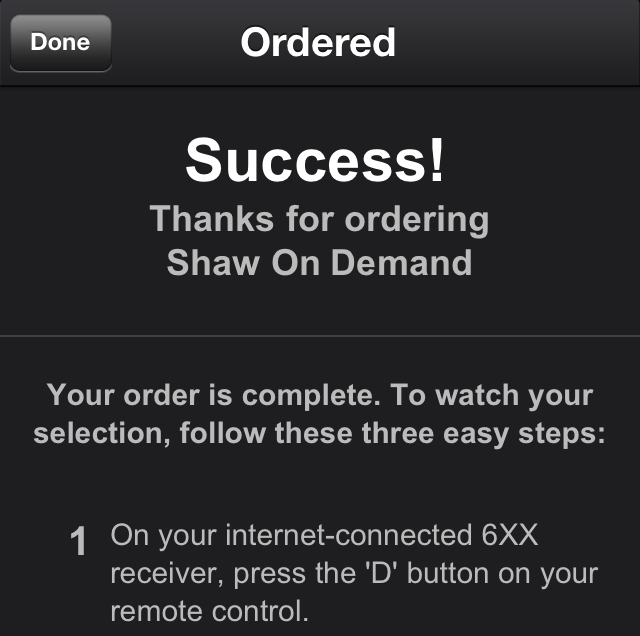
To order a title, tap on the listing, which will take you to a description of it. At the bottom of the description, there is a blue icon that says “Order Now”; tap this to choose your format (SD or HD), and then tap “Complete Order.” When the order is successful, you’ll be taken to a screen with instructions on how to watch the title once you’re settled in front of your receiver.

sod07 sod08 sod09

If you’d rather just add the title to your wishlist, you can do that too. Just to the left of the “Order Now” icon is a small heart icon. Simply tap on this, and the title will appear in your wishlist to be ordered at a later date.

One thing to bear in mind with this app is that you are only able to search titles and remotely order them; it does not stream video.

Any questions about the Shaw On Demand Search app? Don’t hesitate to ask us in the comments below.

*rg

Descriptive Video Services

dvsMany of you will have seen the icon to the right before, but what does it mean?

This icon denotes a program that offers Descriptive Video Service, also known as DVS. Descriptive video means that certain programs feature an extra audio track where a narrator explains what actions are happening on the screen. This is an extremely important feature as it ensures accessibility for persons with visual impairments.

So, how do you enable or disable this audio track on your Advanced 600-Series receiver?

There are two different ways that DVS can be enabled or disabled:

option1
Click to enlarge.

The first way that this can be done is by pressing OPTIONS on the bottom right-hand corner of your remote, and then pressing 4 for “System Settings,” and then 1 for “user Settings.” Use the arrow keys to navigate the options to the left. Highlight “On” under “Descriptive Video,” and then press ENTER. Using the arrow keys, navigate back over to “Save” and press ENTER. To disable DVS, simply follow the above instructions, but highlight “Off” under “Descriptive Video.”

option2
Click to enlarge.

The other option for enabling DVS is a great shortcut that takes a couple of seconds to complete. Start by pressing the HELP button on the bottom left-hand corner of the remote, and then press the D button, which is the bottom of the four round buttons between the volume control and channel up/channel down buttons. Once this is complete, you’ll hear DVS on any show that offers it. To disable DVS using this method, just follow the same steps by pressing HELP, D.

One thing to bear in mind is that if DVS is enabled during a program that does not offer a descriptive video track, you may experience a complete audio drop out and hear nothing at all. If this is the case, try disabling DVS temporarily, or try a channel that is currently airing DVS programming.

If you have any questions about DVS, or anything else, don’t hesitate to leave us a comment below!

*rg