This week, we’re happy to welcome one of our fantastic
customers, Teresa S. (@NeedNewSpace on Twitter), as a guest blogger! She
was able to attend the Big Brother Canada Launch Party and Premiere,
and wrote about her time there.
 When
most people hear the words “Big Brother” they immediately think
conspiracy theory. Government and world dictators watching and listening
to everything we say and do. Right? Well, a few years ago this is
exactly what I would have thought. However, the Big Brother that
everyone is currently talking about is a phenomenon of colossal
proportions. Big Brother fans span the world and now Canada has a new reason to be excited.
When
most people hear the words “Big Brother” they immediately think
conspiracy theory. Government and world dictators watching and listening
to everything we say and do. Right? Well, a few years ago this is
exactly what I would have thought. However, the Big Brother that
everyone is currently talking about is a phenomenon of colossal
proportions. Big Brother fans span the world and now Canada has a new reason to be excited.
If you haven’t yet heard about Big Brother you are either living in
seclusion or you have chosen to have absolutely no connection to the
media in its plentiful and diverse forms.
The Big Brother that I speak of is an extraordinarily successful
television reality series that locks 15 complete strangers alone in a
house with no connection to the outside world for 10 weeks and,
one-by-one, each week, one “Houseguest” is “Evicted” from the house and
the game. The Houseguests are competing to win more than $100,000 in
prizes. To win, they must be the last remaining Houseguest. As we all
know, living with your significant other can be trying at times but
living with total strangers can be absolutely explosive and
unpredictable!!
I’ve been a fan of Big Brother for quite a few years now and as a Canadian, our only real 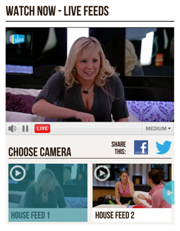 choice
has been Big Brother USA or Big Brother UK online. Finally though,
Insight Productions brought the hugely successful franchise to Canada!
I’ve been begging for a winter season of Big Brother USA for quite some
time now. So, when I finally got my first BlackBerry, the first app I
found was Twitter. And, my first priority? Follow everyone who tweets
about Big Brother! To make a long story just a little bit shorter, I
became obsessed with Tweeting and the need to know what was happening
because I didn’t have access to the 24-hour Live Feeds that spy on the
Houseguests. (Here, in Canada, the Live Feeds are FREE!!! How
awesome is that?!)
choice
has been Big Brother USA or Big Brother UK online. Finally though,
Insight Productions brought the hugely successful franchise to Canada!
I’ve been begging for a winter season of Big Brother USA for quite some
time now. So, when I finally got my first BlackBerry, the first app I
found was Twitter. And, my first priority? Follow everyone who tweets
about Big Brother! To make a long story just a little bit shorter, I
became obsessed with Tweeting and the need to know what was happening
because I didn’t have access to the 24-hour Live Feeds that spy on the
Houseguests. (Here, in Canada, the Live Feeds are FREE!!! How
awesome is that?!)
I’m not an official blogger, because I don’t publish a blog. I mostly
discuss my favourite things, like Big Brother, on Twitter. The thing
is, I do so at length. So, I guess you could say I’m more of a Twogger.
And, in my Twoggings, I happened to meet another Big Brother fanatic and
follower and, one of my favourite Tweeters, Lori Harito aka
@BBConfessions. So, when Big Brother Canada came about, Lori contacted
me and asked if I would be interested in participating in a Launch
Event, my answer was an obvious and resounding “YES”! Shortly
thereafter, and I mean literally, within minutes, I received an email
inviting me and a guest to the Exclusive and very Hush-Hush, Launch
Party to the first ever Big Brother Canada!!!
 Now,
I don’t think I have to tell you how excited I was as my eyes scanned
the words and I scrolled down to see the actual invitation with a
picture of none other than Big Brother USA alum and season 10 winner Dan
“The Master” Gheesling! The nickname is my doing because he was just
that amazing! He masterminded such an epic event in Season 14 that no
other Houseguest could ever dream of replicating. In a most
astonishing move, Dan actually held his own Big Brother funeral as a way
to save himself from eviction. He was poised to be evicted but
his machinations and scheming worked and he saved himself! Watch BB14
and see for yourself. Brilliant. Devious, but brilliant.
Now,
I don’t think I have to tell you how excited I was as my eyes scanned
the words and I scrolled down to see the actual invitation with a
picture of none other than Big Brother USA alum and season 10 winner Dan
“The Master” Gheesling! The nickname is my doing because he was just
that amazing! He masterminded such an epic event in Season 14 that no
other Houseguest could ever dream of replicating. In a most
astonishing move, Dan actually held his own Big Brother funeral as a way
to save himself from eviction. He was poised to be evicted but
his machinations and scheming worked and he saved himself! Watch BB14
and see for yourself. Brilliant. Devious, but brilliant.
Anyhow, back to my invitation and the Big Brother Canada Launch
Party! I received the email while at the doctor’s office and really had a
hard time keeping calm. I reread it on the bus coming home with the
stupidest grin on my face, but still keeping relatively calm. As I
walked through my front door, I could contain myself no longer and a
very awkward happy dance ensued. I have absolutely no rhythm. None.
Nada. Zilch.
My daughter, Alexandra, was the lucky family member who was able to
attend the Launch Party with me and she was as excited as I was.
Upon arrival at the “secret” location, we were met by the friendly staff of Shaw Media
and Slice TV. (We were instructed not to spill any details because, well
let’s face facts here, fans would storm the building! No kidding. Big
Brother Fans are a passionate bunch.) We were given a few directions as
to what was where and told to have a great time and to enjoy ourselves!
And that’s exactly what Alex and I did.
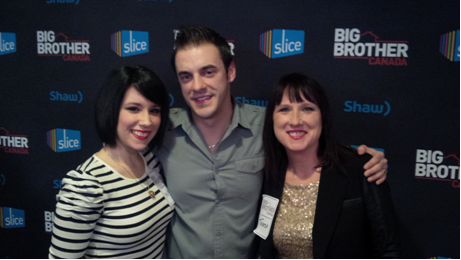
After grabbing our Big Brother Canada nametags, we made our way to the wait staff for a  glass
of courage. We were in a room full of bloggers, Big Brother fans, and
within a matter of minutes, one of the greatest players to ever play Big
Brother! As we nervously waited for Dan to arrive, we made our
way to the slop bar. Yes, a full assortment of toppings was provided to
make this disgusting “oat-like” substance palatable. It really didn’t
help.
glass
of courage. We were in a room full of bloggers, Big Brother fans, and
within a matter of minutes, one of the greatest players to ever play Big
Brother! As we nervously waited for Dan to arrive, we made our
way to the slop bar. Yes, a full assortment of toppings was provided to
make this disgusting “oat-like” substance palatable. It really didn’t
help.
Alex and I migrated to our newest blogger/Twitter Pals, and having
only ever conversed via Twitter, it was remarkable how we all
immediately felt like old friends. Big Brother does that to
people. You either become the best of friends or the nastiest enemies.
As we chatted about our experiences getting to the Launch Party, the
room suddenly starts buzzing. “He’s here. He’s here.
Look, there he is. Oh. My. God. It’s Dan!”, is what is suddenly
rumbling throughout the room. Before we know it, Dan is there and
talking to us about how he orchestrated the monumental funeral on Big
Brother that almost won him the game for a second time. He came in
second to Ian Terry in BB14. Nevertheless, it was an honour and so
much fun meeting Dan and, he is as gracious as a slightly crazy person
can be. Thanks, Dan!
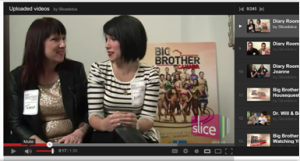 As
we mingled and mixed, Big Brother Canada gave us all the chance to
record our own Diary Room session! I really have to say that the
Houseguests make the Diary Room look easy. It’s not! It’s quite
nerve-racking and scary. As one who is usually behind the camera,
it was a frightening experience to be questioned. All of our Diary Room
Confessions were uploaded by Slice TV to their YouTube channel. Watch if you dare!
As
we mingled and mixed, Big Brother Canada gave us all the chance to
record our own Diary Room session! I really have to say that the
Houseguests make the Diary Room look easy. It’s not! It’s quite
nerve-racking and scary. As one who is usually behind the camera,
it was a frightening experience to be questioned. All of our Diary Room
Confessions were uploaded by Slice TV to their YouTube channel. Watch if you dare!
After we had a chance to mingle, meet, and chat with everyone a Head
of Household competition was held. Three names were drawn and as the
competitors engaged in a Slop Eating Competition; it was clear that only
one would prevail. The unmistakable winner, Jolene, won the best
seat in the house to watch the first ever Big Brother Canada episode
next to Dan Gheesling and her own Big Brother duffle bag.
The really fantastic part about watching the episode at the Launch
Party was that you could feel the excitement in the room and it was
completely uncensored! Something that Dan commented on as well as soon
as the first expletive was uttered from the BBCAN Houseguests. We
still had to endure commercials, but as soon as Big Brother came back to
air, the room fell into complete and utter silence. The room full
of people was there for one reason and one reason only, to be part of
an amazing and historic event. The first ever episode of the first
Canadian Big Brother! And we all enjoyed every last second.
This experience was one I will never forget. And Slice TV, Shaw
Media, and Big Brother Canada made sure that I would have a souvenir or
two of this momentous occasion. Thank you to all those involved in
organizing the Launch Party and for making it such a fabulous
evening! Cheers to a successful and increasingly explosive Big
Brother Canada series!
Like this:
Like Loading...

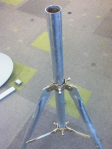
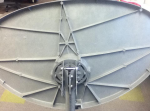
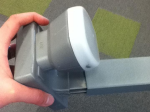
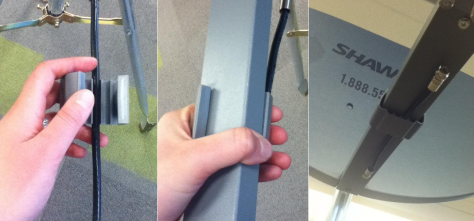
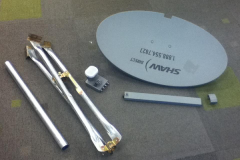 You
should have the dish, tripod and post that goes into the tripod, feed
support arm, clamp mount, cable clip, and LNBF, and stabilizing screws
(these would be used to keep the dish secured to the ground, kind of
like spikes for a tent). You will require wrenches, vice grips, or
pliers to complete this job.
You
should have the dish, tripod and post that goes into the tripod, feed
support arm, clamp mount, cable clip, and LNBF, and stabilizing screws
(these would be used to keep the dish secured to the ground, kind of
like spikes for a tent). You will require wrenches, vice grips, or
pliers to complete this job.