Category Archives: Technical Tips

The new HD Guide is here!

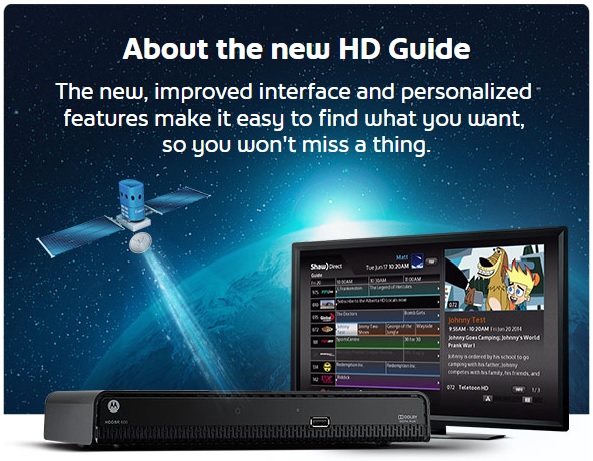
Introducing: the new HD Guide!

The new guide interface is more intuitive, delivering an industry-leading customer experience. The HD Guide user interface offers many improvements when compared to the SD Guide, including: faster navigation, redesigned menus to ensure optimal usability and enhanced shortcuts/preference functionality. The HD Guide is available for 6XX series receivers only. Legacy receivers (including 5XX HD receivers) will not be updated.

HD Guide

With the launch of HD Guide, two features on the 6XX series receiver have been retired:

  • Interactive Weather Application.
  • Instant Pay-Per-View (IPPV) ordering: the IPPV order feature has been removed from the 6XX series. The phone line will remain for caller ID only. IPPV will continue to be available on all legacy receivers.

There are six new major features introduced with the HD Guide:

1.  Customizations

Three different font sizes are available, controlling the number of rows of data in the guide, plus two different program colouring options. These settings can be changed at any time by pressing the following: Options // Preferences // User Settings & Appearance.

2.  MiniTune & MiniPlay

  • MiniTune: You can press the ‘B’ button from the guide to immediately tune the video window to the selected channel, while maintaining your current position in the menu.
  • MiniPlay: For customers with an HDPVR 630, MiniPlay functions the same way as MiniTune, but within your list of recorded programs. You can press ‘B’ to begin playback of the selected program in the video window, while maintaining your current position in the PVR list.

3.  PPV Store

A new way of browsing available PPV movies! Selecting ‘PPV Search’ from the Pay-Per-View (PPV) menu bar allows you to:

  • Narrow results by genre.
  • Show clear ordering instructions and ID above the movie description.
  • Be notified that the purchase has been successful once it’s been ordered through the IVR.
  • Purchased program are identified by a checkmark in the guide, PPV Store, and ‘Upcoming Airings’ screens.

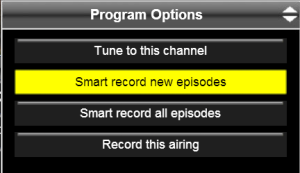
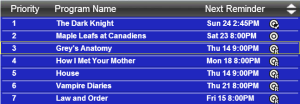
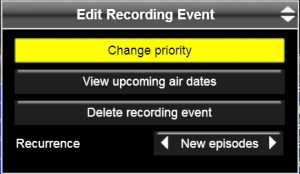
4.  Smart PVR Technology

Our HDPVR has an overlooked feature: the ability to look for the episode on multiple channels. This feature, in conjunction with the fact that Shaw Direct carries channels from every Canadian time zone, effectively eliminates recording conflicts.

  • The HDPVR allows you to record from ‘HD only’, ‘SD only’, or ‘All channels’, rather than a single channel.
  • Descriptive information written in user-friendly language.
  • You can also edit your recording preferences by pressing ‘Enter’ on the program and selecting the new menu option.
  • When customizing a particular recording event, you can now access a ‘More Channels’ selector to change the channel you want the recording to take place on.

5.  Multi-User and Single User Modes

Multi-User Mode: Up to eight users can have their own preferences applied at login, in addition to parentally-defined permissions, locks, and restrictions.

  • The current profile can be changed at any time by pressing the FAV button on the remote. Each profile can have a unique PIN.
  • Users can be copied to a USB key for transfer to another satellite receiver.

Parental restrictions that can be customized for each user include:

  • Ratings locks
  • Channel locks
  • Access to Adult content
  • Ability to order free VOD titles
  • Daily VOD purchase limit ($ value)
  • Auto-logout duration
  • PVR Permissions (ability to schedule new recordings, delete existing recordings, etc.)

Preferences that can be customized for each user include:

  • Onscreen and audio language
  • Closed Captions display and settings
  • Descriptive Video
  • Font size and program colouring style
  • Unsubscribed channels in Guide (show or hide)
  • Caller ID notifications (not available on the HDDSR 600)
  • Automatic prompt to delete recordings

Single User Mode: It uses the same approach as before, wherein a single set of restrictions is applied consistently and unlocked individually on an ad-hoc basis. While Multi-User mode generally does not present a PIN challenge upon encountering locked content, Single-User mode does.

  • When migrating from SD Guide with the Parental Controls enabled, you will be placed into this mode by default.
  • You can switch between Single and Multi-User modes whenever you want. If set, a PIN is required to make this change.

6.  Notification Bar

The Notification Bar replaces the ‘Alert’ (!) icon used in the SD Guide and will notify you of Caller ID, PPV purchases, reminders or auto-tunes, dual recordings, and more. It also displays the signal strength, Internet connectivity status (for VOD), HDD space (HDPVR only) and number of active reminders.

Press the ‘Down’ arrow while watching TV to show the notification bar.

Other enhancements:

  • The A, B and C buttons on the remote control serve as shortcuts in a number of different windows – try them out!
  • New ways to search for content: Keyword Search and Category Search. Press Menu // Search to see the different categories.
  • Redesigned Video on Demand store.

Now go on and play with your new HD guide!

HD Guide 2

*met

Sun Transit – Fall 2013

You may have heard the phrase “Sun transit” before regarding a twice-yearly natural phenomenon that may cause temporary signal loss. But, what exactly is Sun transit?

Sun transit is also known as a “sun outage,” or “sun fade.” During the Spring and Autumn each year, the Sun lines up with all satellites in orbit, which can cause interference with services down here. This happens due to a massive amount of thermally generated radio frequency noise from the Sun. The interference can range from a bit of snow on your screen to a complete loss of services. Some people might not even notice any issue.

Sun transit impacts every satellite in orbit, so all satellite service providers and even cable providers may experience issues while this is happening. Because we currently have two satellites, the estimated interference times are different for each satellite, so you might lose signal on an English standard definition channel at a different time than on a high definition or French channel.

Here are the estimated times for possible Sun transit interference on both satellites across the country (all times are approximate and local):

Anik F1-R (English standard definition channels)

Location Start End Duration
Vancouver, BC 11:42 AM 11:56 AM Oct 7 – 14
Whitehorse, YK 11:40 AM 11:54 AM Oct 9 – 15
Calgary, AB 12:46 PM 1:00 PM Oct 8 – 15
Saskatoon, SK 12:49 PM 1:03 PM Oct 8 – 15
Yellowknife, NT 12:46 PM 1:00 PM Oct 10 – 17
Winnipeg, MB 1:53 PM 2:07 PM Oct 7 – 15
Resolute Bay, NU 1:50 PM 2:04 PM Oct 11 – 18
Toronto, ON 3:02 PM 3:16 PM Oct 5 – 13
Montreal, PQ 3:04 PM 3:18 PM Oct 6 – 13
Fredericton, NB 4:06 PM 4:20 PM Oct 6 – 13
Halifax, NS 4:08 PM 4:21 PM Oct 5 – 13
Charlottetown, PEI 4:07 PM 4:21 PM Oct 6 – 13
St. John’s, NL 4:39 PM 4:53 PM Oct 6 – 13

Anik F2 (All HD, French standard definition channels, Galaxie, radio stations, and Pay Per View)

Location Start End Duration
Vancouver, BC 11:59 AM 12:13 PM Oct 7 – 15
Whitehorse, YK 11:56 AM 12:10 PM Oct 9 – 17
Calgary, AB 1:03 PM 1:17 PM Oct 8 – 15
Saskatoon, SK 1:07 PM 1:17 PM Oct 8 – 15
Yellowknife, NT 1:03 PM 1:16 PM Oct 10 – 17
Winnipeg, MB 2:10 PM 2:24 PM Oct 7 – 15
Resolute Bay, NU 2:06 PM 2:20 PM Oct 11 – 18
Toronto, ON 3:19 PM 3:33 PM Oct 5 – 13
Montreal, PQ 3:20 PM 3:34 PM Oct 6 – 13
Fredericton, NB 4:23 PM 4:37 PM Oct 6 – 13
Halifax, NS 4:24 PM 4:38 PM Oct 5 – 13
Charlottetown, PEI 4:24 PM 4:37 PM Oct 6 – 13
St. John’s, NL 4:55 PM 5:09 PM Oct 6 – 13

At this point, information for Anik G1 is not yet available as this is the first Sun transit the satellite has experienced. If you are missing any of the newest channels that we’ve added during the month of October, and the outage lasts for only a few minutes, chances are that it was Sun transit. If the outage lasts more than 20 minutes, there could be an issue with your system, and we recommend contacting us.

If you want estimated times more specific to where you live, Telesat offers a sun transit calculator on their website. Just make sure you’ve selected Anik F1R and Anik F2 for your satellites, “Ku” for your frequency band, and 1 metre for the antenna diameter so you get the most accurate results. It’s not exact as our satellite dishes are smaller than a metre in diameter, but it will give you a pretty good idea of when to expect interference.

So, what are some things that could help you during Sun transit?

  • If you are experiencing any loss of signal, wait until the estimated time for interference is over before trying any resets or calling in for troubleshooting.
  • Wait until after the estimated interference time for your area is over prior to activating any new receivers, or adjusting your dish.
  • If you are a fan of Pay Per View movies, it might be a good idea to order something that isn’t during the estimated interference time so that you don’t miss part of your show.

If your service interruption continues after the estimated time (give or take about 10 minutes), please contact us for assistance. On that note, if you have any questions regarding Sun transit, or anything else, feel free to leave us a comment!

*rg

Parental Controls on 600-Series Receivers

ratings

We carry a wide selection of programming for audience members of all ages. Of course, this means that there may be content that you don’t want the young ones in your home to view. That’s where parental controls come in. Parental controls on the Advanced 600-Series receivers allow you to enable locks specific channels, and certain ratings for both TV shows and movies.

Rating information is provided by the individual broadcasters, and this information is entered into our interactive programming guide. When you’re looking at a show that is listed in the guide, press INFO on your remote to see what the rating is.

Certain shows (for example, documentaries or older programs) may not have ratings assigned to them. If you’re concerned about potential content in unrated programs, the 600-Series also allows you to lock content without ratings, too.

In order to set parental locks, press OPTIONS on your remote, and then 2 for “Parental Controls.”

The first time you enter this menu, you’ll see a prompt asking you to enter a four-digit code for your parental locks. Choose your code (as a tip, don’t use something like the last four digits of your phone number, or something like a birth date as these may be common knowledge in your household), and then press ENTER. You will then be asked to confirm the four-digit code you just entered. Punch this in, and press ENTER again.

parentalcontrolscreenYou’ll now see a screen pop up called “Parental Controls.” The first thing you’ll want to do is highlight the line for “enable locks,” and scroll to the right using the arrow keys until you see “enabled.” This will turn on the locks that you’ll set momentarily.

The next two lines will be “TV rating” and “Movie rating.” Highlight whichever you’d like to edit, and then use the right or left arrow keys to scroll through the different ratings. As a tip, the rating you choose means that that rating, and anything above it will be locked. So, if you choose to lock PG for TV ratings, 14+ and 18+ will also be locked.

Next, you’ll see “locked channels.” Use the left or right arrow keys to either “hide” or “show” channels with locked content. The option just below is “locked” programs, which you can do the same with. After this, you’ll see “channel locks,” which allows you to lock the content of a specific channel.

Below this is “change password,” which of course allows you to enter a new four-digit code.

The last item is “unrated programs,” which comes in handy in a couple of different situations. As mentioned earlier, some programs may not actually have a rating assigned, so you can’t be sure if the content is appropriate for your kids. Locking content without a rating removes this risk. The second scenario can happen after your receiver has been reset, or the guide information is reloading. The guide will not have any information in terms of program title or rating, so enabling locks will lock all channels until the guide information has been restored.

Have any questions about parental controls on the Advanced 600-Series? Leave us a comment below!

*rg

Descriptive Video Services

dvsMany of you will have seen the icon to the right before, but what does it mean?

This icon denotes a program that offers Descriptive Video Service, also known as DVS. Descriptive video means that certain programs feature an extra audio track where a narrator explains what actions are happening on the screen. This is an extremely important feature as it ensures accessibility for persons with visual impairments.

So, how do you enable or disable this audio track on your Advanced 600-Series receiver?

There are two different ways that DVS can be enabled or disabled:

option1
Click to enlarge.

The first way that this can be done is by pressing OPTIONS on the bottom right-hand corner of your remote, and then pressing 4 for “System Settings,” and then 1 for “user Settings.” Use the arrow keys to navigate the options to the left. Highlight “On” under “Descriptive Video,” and then press ENTER. Using the arrow keys, navigate back over to “Save” and press ENTER. To disable DVS, simply follow the above instructions, but highlight “Off” under “Descriptive Video.”

option2
Click to enlarge.

The other option for enabling DVS is a great shortcut that takes a couple of seconds to complete. Start by pressing the HELP button on the bottom left-hand corner of the remote, and then press the D button, which is the bottom of the four round buttons between the volume control and channel up/channel down buttons. Once this is complete, you’ll hear DVS on any show that offers it. To disable DVS using this method, just follow the same steps by pressing HELP, D.

One thing to bear in mind is that if DVS is enabled during a program that does not offer a descriptive video track, you may experience a complete audio drop out and hear nothing at all. If this is the case, try disabling DVS temporarily, or try a channel that is currently airing DVS programming.

If you have any questions about DVS, or anything else, don’t hesitate to leave us a comment below!

*rg

Smart Recording

If you have an Advanced HDPVR 630, you may have heard of “smart recording.” But what exactly is it?

By using smart recording, your PVR will automatically look for the earliest airing of a program that matches your event criteria. So, if you’ve said that you only want to record new HD episodes of Elementary, your PVR will go through the listings and find the first scheduled showing of a new episode, in HD only.

You can also set priority levels for each show that you set reoccurring recordings for, so when your PVR is scheduling its recordings, it will start with the highest priority shows first, and work its way down. This customisation ensures that exactly what you expect to see recorded will be waiting for you in your PVR list.

In the event of a recording conflict, your PVR will adjust to find a different time to record a show that is set to smart record in order to resolve the conflict. It’s like a referee for your TV. Creating smart recording events allows your PVR to have the maximum flexibility so it can work to record as much content as possible.

Recording conflicts will occur when there are more recordings scheduled than tuners available.  The Advanced HDPVR 630 can record up to two programs at the same time as it has two available tuners.

If there were three recordings scheduled manually through the guide at the same time, there will be a recording conflict and only two shows will wind up being recorded.

By using smart recordings, the PVR will find an alternate time for the show with the lowest priority. How can you tell what has the lowest priority without customising this? As a rule, the PVR will choose the shows on the two lowest channel numbers. So, if you had manually scheduled recordings for shows on channels 12, 36, and 43, if you did not adjust the priority settings, the shows on channels 12 and 36 would be recorded.

Here is how you can schedule a smart recording for a reoccurring series on your Advanced HDPVR 630:

1. Press the GUIDE button on your remote and find the program you would like to record.

2. Highlight the program in question, and press ENTER/OK. This will bring up the “Program Options” menu.

3. Press the DOWN arrow button and highlight either “Smart record new episodes” or “Smart record all episodes” and then press ENTER/OK. The recording will now schedule. If you are recording a show that is no longer being made, you would be best to record all episodes, whereas if you are recording a show that is still in production and have seen past episodes, it may be best to record new episodes.

progopt


Next, you can edit the settings for your scheduled recordings:

1. Press EXIT to close the guide, and then press MENU. This will bring up a menu bar along the bottom of your screen.

2. Press the RIGHT arrow button and highlight “PVR.” Press ENTER/OK.

menupvr

3. Press the RIGHT arrow button and highlight “Options,” then press ENTER/OK. This will take you into a list containing all of the programs that you have scheduled to record.

menupvr2

recordings4. Find the one you would like to edit, highlight it by pressing either the UP or DOWN arrow button, and press ENTER/OK. This will bring up the “Edit Recording Event” menu.

5. From this menu, you can change the priority, delete the recording event, change the recording recurrence, select a channel you would like to record the program on, and more. Changing the priority will mark how important the show is to you in terms of scheduling (as discussed earlier). Recurrence changes between recording all episodes or new ones.

event

If you have any questions about smart recordings, don’t hesitate to ask us!

*rg

Multiswitches

A quad LNBF (left) and xKu LNBF (right).

Shaw Direct satellite dishes are equipped with LNBFs that allow up to four lines to be run into your home. Most of our receivers require just one line to function, but our PVRs (both our original DVR 530 HD and newest Advanced HDPVR 630) need two lines. If you want to enjoy service to multiple rooms in your home, you may find that you’ll wind up needing more than four lines. If this sounds like you, then you’ll be happy to learn that we can offer a device known as a “multiswitch” in order to have more lines installed for more receivers!

But just what is a multiswitch?

A multiswitch is a device that consists of A/B switches (which switch back and forth between horizontal and vertical polarities, depending on what channel you’re trying to watch) and splitters that turn each LNBF port from one into two (or more depending on the type of multiswitch you have).

4x8_multiswitch_largeAlthough they may sound a bit like a simple splitter, a multiswitch cannot be replaced by a splitter. Without the help of the A/B switch, splitting a single line into two will cause issues with receiving signal. If one receiver connected to a split line is viewing a channel on the horizontal polarity, then the second receiver on the split line will only be able to view another horizontal channel; it will not be able to access a channel on the vertical polarity). For more information on the two different signal polarities that we use, please see our article on LNBFs.

5x8_multiswitch_large
A 5×8 multiswitch.

Shaw Direct generally uses a “4×8” multiswitch, which just means that it needs the four lines running from your LNBF connected to the four inputs, and then it can output signal for up to eight distinct lines. We also use a “5×8” multiswitch; the difference between this and the 4×8 is that there is an extra input that can be used to connect cable services.

For commercial applications where more than eight lines may need to be run, we also offer a “4×16” multiswitch, which will allow up to 16 lines to be run from the dish.

Multiswitches can be either “passive” (non-powered) or “active” (powered by an external AC source); our multiswitches are all powered to ensure strong signal strength in any system. Longer cable runs can result in lower signal strengths, but using an active multiswitch will help mitigate this.

A multiswitch can be installed either outside near the dish (it’s waterproof and works well in any weather condition), or inside your home (in a utilities room, for example). There must be a connection from each port on the LNBF to each of the four inputs on the multiswitch. From there, the lines would be run from the outputs to wherever in your home you require service. Remember that each account has a six-receiver limit, and if you wanted more than six receivers, you would have to open a second account.

If you’re thinking of adding a new receiver, but need a multiswitch in order to do so, don’t hesitate to contact us through here, on Facebook, Twitter, or by calling our toll-free number – 1.888.554.7827.

Using an External Hard Drive with your HDPVR 630

header_HDDShaw Direct’s Advanced HDPVR 630 has an integrated hard drive which allows you to record up to 175 hours of standard definition content, or about 45 hours of high definition content. Not enough space for all of the great shows you want to record? Not to worry – if you need more space, you can use an external hard drive to make sure you don’t miss a thing.

Wondering what kind of external hard drive will work with your HDPVR 630? Here are the required features to ensure compatibility:

  • Make sure the external hard drive has an eSATA connection, which is up to six times faster than even USB 2.0. This makes the external hard drive ideal for HD video. What’s more is that you can record two HD programs while watching previously recorded HD programming without any performance issues.
  • The external hard drive must be externally powered. Some may only be USB powered, but this will need to have its own power supply that plugs into an AC outlet.
  • The largest external hard drive that will work is 2.0 TB, which will give you an incredible amount of additional storage space. 500 GB will give you about 340 hours of standard definition or 90 hours of high definition; 1.0 TB will provide about 680 hours of standard definition or 180 hours of high definition; 2.0 TB gives you a staggering 1,360 hours of standard definition or 360 hours of high definition. If you were to fill a 2.0 TB external hard drive and the hard drive of your PVR with standard definition programming, you could watch shows from today (March 7) non-stop until May 10!
  • Look for an external hard drive that is rated for PVR or DVR usage. These are designed to be cooler, quieter, and support multiple HD streams being recorded or played at the same time. They’re also able to run all-day, everyday, which makes them the most reliable choice.

So, how do you go about hooking up the external hard drive to your PVR? There are just a few steps to get it ready:

  1. Connect the eSATA cable (it should be provided with the drive you purchased) from the external hard drive to the port labeled “eSATA” on the back of your HDPVR 630.
  2. Connect the power cable from your external hard drive to a power bar or wall outlet.
  3. If your external hard drive has a power switch, turn it on now. Ensure the power or status light illuminates.
  4. Restart your HDPVR 630 by holding down the power button on the front panel for 10 seconds.
  5. When the receiver comes back on, a setup wizard will guide you through the process of formatting the external hard drive for use with this satellite receiver. This will remove ALL data and partitions on the external hard drive.
  6. Formatting will complete within a few seconds and you will be alerted that your drive is ready for use.

There are some other things to bear in mind about using an external hard drive with your HDPVR 630. For example, you can only use one external hard drive with your PVR at any given time, and you can only use the external hard drive with one specific PVR. Additionally, the external hard drive won’t be able to be used with any other device while it’s “married” to your PVR.

If you decide to stop using your external hard drive with your PVR, or want to switch to a new one, you just need to disconnect it and reboot your PVR. The setup wizard will then alert you that your external hard drive is missing, and then will provide some prompts to delete it from your PVR. This will remove any associated recordings from the PVR list that were stored on the external hard drive, allowing you to connect a new one by following the setup instructions.

Having any problems using an external hard drive with your HDPVR 630? Check out Tech Central to read over some helpful tips, or let us know that you need a hand!