Tag Archives: walkthrough

Setting Up a Dish on a Tripod

If you use our Home Away From Home program and take your services with you, or live in an apartment building or condo where you can’t install a dish on the building, putting a dish on a tripod may be the best option for you. Wondering how to put it all together? Here’s a quick guide for you to follow!

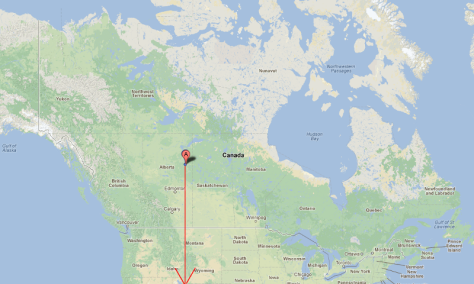
Once you’ve ordered and received your tripod and dish kit, you’ll need to choose a location to set everything up. Our satellites are located above the Equator, due south of Fort McMurray, Alberta (111.1° west longitude), so generally speaking, you will need a clear line of sight to the south (if you live west of Fort McMurray, the view should be more to the southeast, while if you live east of there, it should be more to the southwest).
29_map

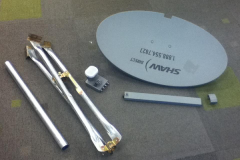
29_01You should have the dish, tripod and post that goes into the tripod, feed support arm, clamp mount, cable clip, and LNBF, and stabilizing screws (these would be used to keep the dish secured to the ground, kind of like spikes for a tent). You will require wrenches, vice grips, or pliers to complete this job.


29_02


First, you’ll want to set up the tripod itself. Start by pulling the legs apart so that the tripod is standing upright.

Now, insert the pipe into the centre of the tripod, and tighten the bolts until the pipe is secure.

29_03


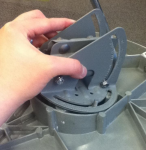
Attach the clamp mount to the dish by aligning bolt posts with slits on sides.Ensure that the larger side of the bracket (right side of photo) is pointing towards the bottom of the dish.


29_04


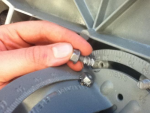
Insert screw bolts into holes on back of dish. 

Tighten only very lightly at this point.


29_05


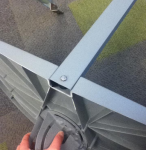
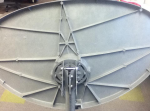
Take the dish, and attach the feed support arm to it, tightening bolt until secure.


29_06


Place dish on tripod and tighten bolts so that dish is secure.


29_07


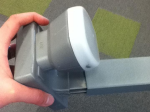
Slide LNBF into end of arm, and tighten bolt so that LNBF is secured to the arm.


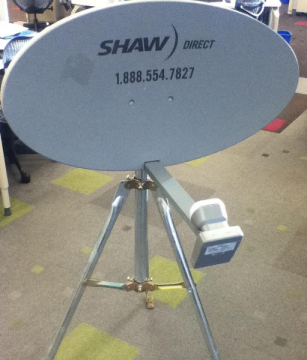
Your dish and tripod should now look something like this:

29_08

From this point, you’ll want to align the dish and run cables as outlined in our self-installation document. When this is done, you can secure the cables using the cable clip that was included with the dish.

Untitled

Your dish should now be fully assembled and ready for use! If you require any further assistance with your installation, please do not hesitate to contact us here, on Facebook, Twitter, or by calling our Technical Support team at 1.888.554.7827.

Using an External Hard Drive with your HDPVR 630

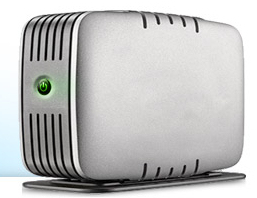
header_HDDShaw Direct’s Advanced HDPVR 630 has an integrated hard drive which allows you to record up to 175 hours of standard definition content, or about 45 hours of high definition content. Not enough space for all of the great shows you want to record? Not to worry – if you need more space, you can use an external hard drive to make sure you don’t miss a thing.

Wondering what kind of external hard drive will work with your HDPVR 630? Here are the required features to ensure compatibility:

  • Make sure the external hard drive has an eSATA connection, which is up to six times faster than even USB 2.0. This makes the external hard drive ideal for HD video. What’s more is that you can record two HD programs while watching previously recorded HD programming without any performance issues.
  • The external hard drive must be externally powered. Some may only be USB powered, but this will need to have its own power supply that plugs into an AC outlet.
  • The largest external hard drive that will work is 2.0 TB, which will give you an incredible amount of additional storage space. 500 GB will give you about 340 hours of standard definition or 90 hours of high definition; 1.0 TB will provide about 680 hours of standard definition or 180 hours of high definition; 2.0 TB gives you a staggering 1,360 hours of standard definition or 360 hours of high definition. If you were to fill a 2.0 TB external hard drive and the hard drive of your PVR with standard definition programming, you could watch shows from today (March 7) non-stop until May 10!
  • Look for an external hard drive that is rated for PVR or DVR usage. These are designed to be cooler, quieter, and support multiple HD streams being recorded or played at the same time. They’re also able to run all-day, everyday, which makes them the most reliable choice.

So, how do you go about hooking up the external hard drive to your PVR? There are just a few steps to get it ready:

  1. Connect the eSATA cable (it should be provided with the drive you purchased) from the external hard drive to the port labeled “eSATA” on the back of your HDPVR 630.
  2. Connect the power cable from your external hard drive to a power bar or wall outlet.
  3. If your external hard drive has a power switch, turn it on now. Ensure the power or status light illuminates.
  4. Restart your HDPVR 630 by holding down the power button on the front panel for 10 seconds.
  5. When the receiver comes back on, a setup wizard will guide you through the process of formatting the external hard drive for use with this satellite receiver. This will remove ALL data and partitions on the external hard drive.
  6. Formatting will complete within a few seconds and you will be alerted that your drive is ready for use.

There are some other things to bear in mind about using an external hard drive with your HDPVR 630. For example, you can only use one external hard drive with your PVR at any given time, and you can only use the external hard drive with one specific PVR. Additionally, the external hard drive won’t be able to be used with any other device while it’s “married” to your PVR.

If you decide to stop using your external hard drive with your PVR, or want to switch to a new one, you just need to disconnect it and reboot your PVR. The setup wizard will then alert you that your external hard drive is missing, and then will provide some prompts to delete it from your PVR. This will remove any associated recordings from the PVR list that were stored on the external hard drive, allowing you to connect a new one by following the setup instructions.

Having any problems using an external hard drive with your HDPVR 630? Check out Tech Central to read over some helpful tips, or let us know that you need a hand!

Understanding Your Interactive Programming Guide

The interactive on-screen guides available with our 600-series receivers – the HDDSR 600, HDDSR 605, and HDPVR 630 – offer colour coding and a variety of different symbols to help you figure out what is being displayed. This is a brief explanation to understanding your on-screen guide.

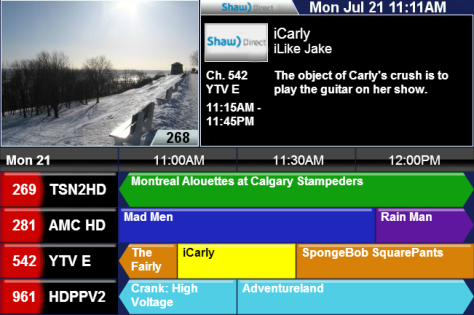
The on-screen guide for the 600-series will look much like this:

20_guide

At the top of the screen, on the left, you’ll be able to see what is playing on the current channel so that you don’t miss anything while you’re browsing. It will also display the current channel number.

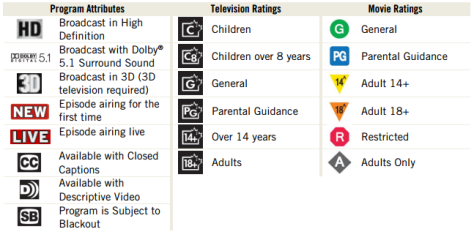
To the right of this, you’ll see information about the program that you’re looking up in the guide, including the show and episode titles, what channel it’s on, the time you can watch it at, the rating, and any relevant program attributes (see the table under “Guide Symbols” later in this post for details).

Down below this, you’ll see the programming grid, complete with timeslots, channel numbers and names, and the programs that will be airing over the next 90 minutes. You can scroll through this with arrows on your remote control, and press INFO to display more detailed information about the program.

All programming information is provided to us by each individual broadcaster; if you notice any discrepancies, please let us know what channel, time, and show the issue occurred with so we can escalate the concern accordingly. We are however, unable to make any changes to what is displayed in the guide.

Colour Coding:

Blue is general programming, which includes network series, news, general specials, and most other regularly airing programs.

Green means sports and most sports-related programs, like sports talk shows, live sporting events or replays, and sports-related series.

Purple is for regular movies, including most documentaries.

Orange is any programming geared towards kids, or the whole family.

Aqua means that the programming is Pay Per View content, including movies, concerts, or sporting events.

Red denotes a Shaw Direct channel, so any of the information channels, or the Shaw Direct TV Network.

Anything highlighted in grey is something that is not included in your current programming package.

If you see something in yellow, it’s the item in the guide that is currently selected. As you navigate through the guide, you’ll see this move around.

Guide Symbols:

20_symbols

Any questions or suggestions about our interactive on-screen guide? Let us know in the comments!

*rg

Programming Your Remote

No one likes having to juggle multiple remotes to control all of their entertainment devices. Luckily, you can program your Shaw Direct satellite remote to work with most devices, which will allow you to consolidate up to three remotes!

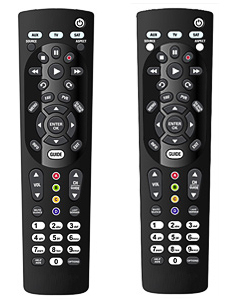
There are two main types of remote controls that we currently carry: the IRC 600, and the URC 600. They’re nearly identical to each other, except for a couple of small differences.

19_remotes
The remote on the left is the IRC 600, and the remote on the right is the URC 600.

Take a close look at the SOURCE and ASPECT buttons near the top of the remote. If the two buttons are black, you have the IRC 600; if the buttons are white, then you have the URC 600.

The first step to programming your remote control to work with other electronics is to find the code(s) associated with the particular brand and device. Some brands can have dozens of potential codes, so the simplest way to go about this is to scan for the code.

Here’s how you can scan for a code with the IRC 600:

  1. Scanning Method to Program TV
  2. Press and hold SAT until the mode buttons flash at least three times.
  3. Enter 9-9-1. SAT should blink twice.
  4. Press CH+ once per second until the receiver turns off. (If you pass the correct code, press CH- to scan backwards).
  5. Press SAT to lock in the code. The SAT key should blink twice.

Here’s how to scan for a code if you have the URC 600:

  1. Verify that the device is on.
  2. Press and hold ENTER and MUTE until the mode buttons flash in rotation.
  3. While aiming the remote at the device, press and hold the up arrow button until the TV turns off.
  4. Press MUTE, once.
  5. Device should power back on. If not, repeat steps 3 and 4.
  6. Press ENTER to lock in the code if the device turned on.

Once you’ve successfully locked in the codes for your devices, you can control power, volume, and other functions with the Shaw Direct remote by pressing the corresponding mode button (TV or AUX). If you want to simplify things even more, you can program your remote for master volume and master power.

Programming Master Volume for the IRC 600:

  1. Press and hold SAT until the mode buttons flash at least three times.
  2. Press 9-9-3. The SAT key should blink twice.
  3. Press the device key (TV or AUX) to lock volume to. The device key will blink twice.

Programming Master Volume for the URC 600:

  1. Hold both ENTER and SAT until the SAT button illuminates.
  2. Press VOLUME UP, then TV. The SAT button will blink 3 times and go out.

Programming Master Power for the IRC 600:

  1. Press and hold SAT until the mode buttons flash at least three times.
  2. Press 9-9-5. The SAT key should blink twice.
  3. Press and release each device key once, in the order you want them activated in the Master Power sequence.
  4. Press POWER to save the sequence. The SAT key should blink twice.

Programming Master Power for the URC 600:

  1. Hold both ENTER and POWER until the SAT button illuminates solid red.
  2. Press 1. SAT will blink 3 times and go out.
  3. Press SAT once to return remote to SAT mode.

That’s all there is to it! If you encounter any issues while trying to program your IRC or URC 600 remote control, let us know so we can lend a hand.

*rg

Shaw Direct ‘My Account’ Walkthrough


Have you ever wanted to change your programming but didn’t have the time to wait on the phone? Have you been in a pinch to pay your bill and wanted to get it done as quickly as possible? Have you had a technical issue that you wanted to look more in-depth into on your own? If you answered yes to any of these questions, then don’t worry; our online Self Serve option gives you the ability to do all this and so much more! We’ll have you covered so that you can both understand what the My Account has to offer, and feel comfortable using it.


To access My Account, visit our website. You’ll notice different options in a row:

01


As indicated you’ll need to click on “My account” to bring you to the log in page. When there, you’ll notice two different sections:

  • Not registered yet?

OR

  • Ready to go?

We’ll start by showing you how to sign up for the first time. If this is the case you’ll need to click on “Register your account.” In doing so, it will take you to a page asking you to fill out a few pieces of information.

02

Once you enter in all the required information, press “continue.”  There will be a confirmation email sent to the address you typed in previously. The email will not hold a temporary password or any information relevant to signing in for the first time; it is just to let you know that the submission has gone through successfully. After entering the information, return back to the main log-in page for the Self Serve. From there the only information required to log-in will be your account number and password that you selected.

All right! Now you will be logged in and are able to experience the world of Self Serve and all it has to offer! When you first log-in, you’re going to see a screen that looks like the one below:

03


Most things are pretty self-explanatory. On the right-hand side, there’s a quick reference box that will update you on some key information pertaining to your account with us. It will show your account number, the current account balance, and whether you’re signed up for Pre-Authorized Payments or Paper-Free Billing. To the left of this, you can manage your programming, make payments, adjust your Self Serve account by updating email address or password, and much more. One of our favourites is the “restore missing channels or Pay Per View orders” link; if your receiver loses authorisation, you can use this to send a “refresh” to all receivers active on your account!

On the far left, you’ll notice quick links to choose from so you can easily navigate from any section:


04The first option is “[Log out],” which is what you’ll want to select when you’re done with everything.

The “Refer-a-Friend” link will take you to a page with information about our program of the same name.

“View your bill” will allow you to view the past six months of your Shaw Direct bills in either PDF format, or as a simple webpage.

“Paper-Free billing” will take you to a page where you can add, remove, or change your email address for receiving an emailed billing notification each month.

“Payment Card payment” allows you to make a one-time payment to your account with a credit card or Visa debit.

The link for “Pre-authorized payments” will let you add, remove, or update your pre-authorized payment information for your monthly billing.

“Change password” allows you to update your My Account password, as well as update the email address associated with the online account.

Lastly, you will see Receiver Refresh, which is the same as the “restore missing channels or Pay Per View orders” link mentioned previously.

Now that you’re aware of all that Shaw Direct’s My Account feature has to offer, we encourage you to explore it and fully enjoy our services that are now at your fingertips! Check out and try My Account today, and as always, if you have any questions, don’t hesitate to leave us a message below!

*rg